Point cloud data is everywhere in modern construction projects—but on its own, it’s almost useless. While Scan to BIM has become the standard for renovation, as-built documentation, and facility management, many teams quickly run into the same problems: massive datasets, slow modeling workflows, and inconsistent accuracy. The reality is simple—capturing reality is easy, but turning it into a usable BIM model is not. A raw point cloud doesn’t deliver value until it’s properly converted into a structured Revit model—and that’s where most projects succeed or fail.
What Does “Convert Point Cloud to Revit Model” Actually Mean?
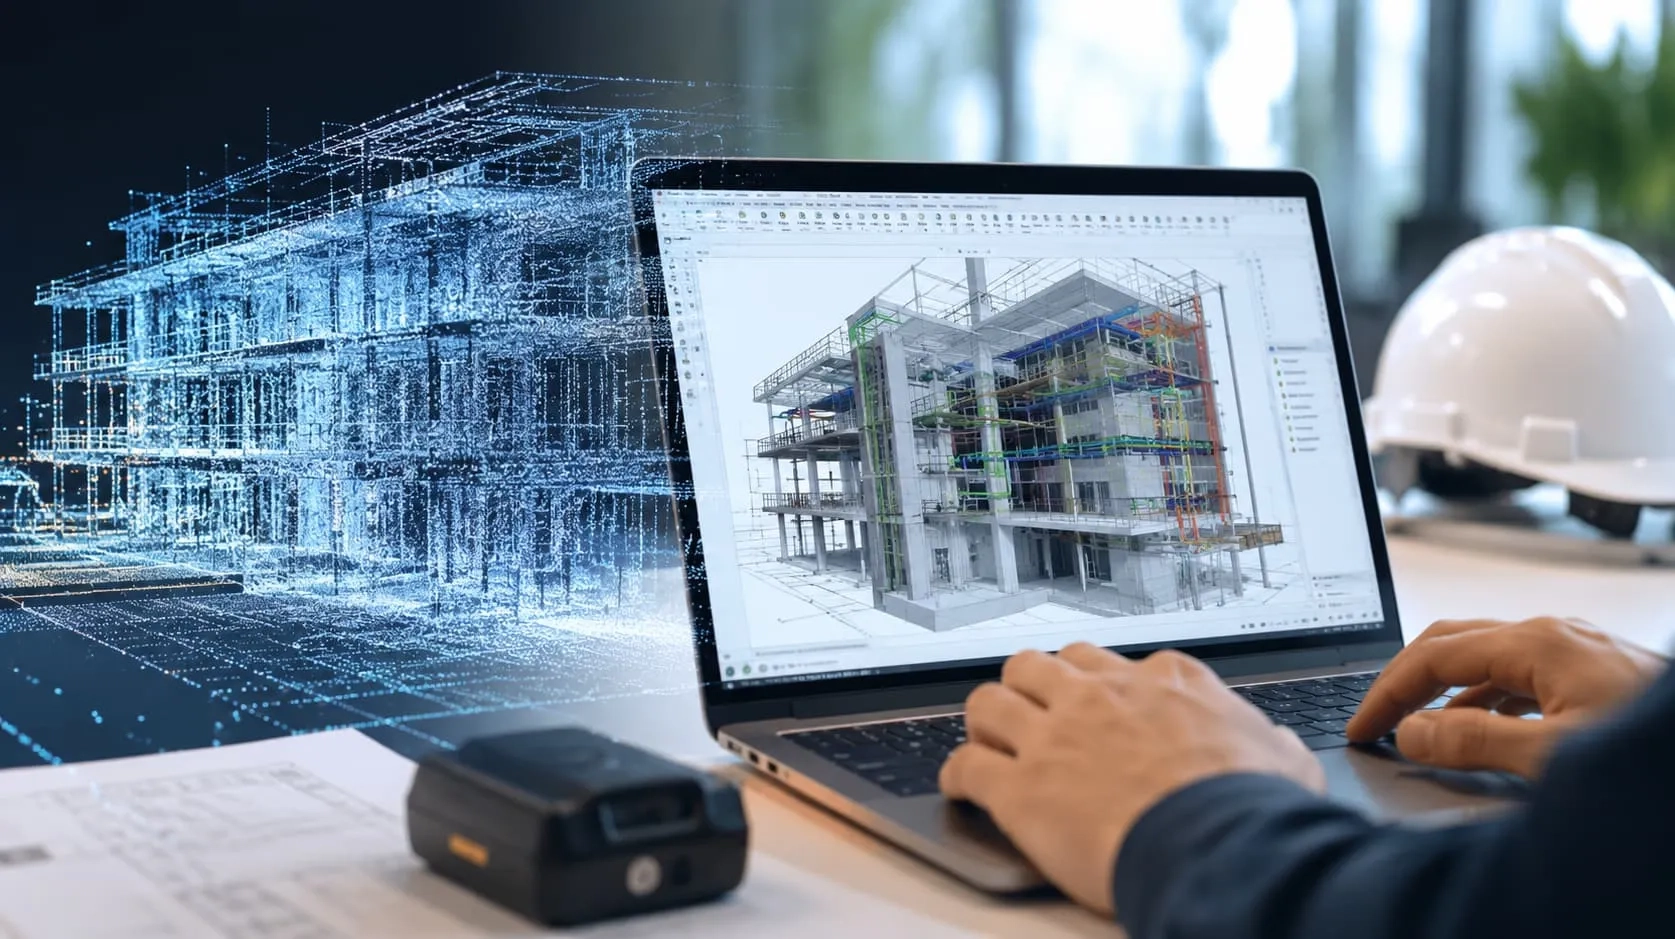
At first glance, converting a point cloud to a Revit model might sound like a simple file import—but in reality, it’s a much more complex and structured process. It’s not about bringing data into Autodesk Revit, but about transforming raw scan information into an intelligent, usable BIM model.
This process involves interpreting millions of data points to understand real-world geometry, then rebuilding that geometry into meaningful elements such as walls, floors, structural components, and MEP systems. At the same time, the model must meet the required Level of Detail (LOD), ensuring it aligns with the project’s purpose—whether for coordination, construction, or facility management.
In essence, converting a point cloud to a Revit model is a structured workflow:
Scan → Interpret → Model → Validate
Each step adds clarity, accuracy, and value—turning unstructured data into a reliable digital representation of reality.

Read more:
Enhancing Renovation Projects with Point Cloud to BIM Technology
How Can Revit BIM Services Make The Building Process Effectively?
When Do You Need This Process? (Real Use Cases)
Converting point cloud data into a Revit model becomes critical when real-world conditions need to be accurately captured, understood, and reused in a BIM environment. Below are the most common scenarios where this process delivers real value:
Renovation / Retrofit
In many renovation projects, original drawings are missing, outdated, or unreliable. A point cloud allows teams to capture existing conditions, but without converting it into a Revit model, it’s difficult to design or coordinate effectively.
The goal here is to create an accurate as-is model that serves as the foundation for all design decisions.
Industrial Facilities
Industrial environments often involve highly complex MEP systems, tight spaces, and dense equipment layouts. Working directly with point cloud data is inefficient for coordination.
A Revit model enables clash detection, system coordination, and more efficient planning.
Facility Management
For long-term operations, point cloud data alone isn’t practical for managing assets. Organizations need structured, information-rich models.
Converting to Revit supports digital twin creation, asset tracking, and lifecycle management.
The Complete Workflow: From Point Cloud to Revit Model
This is where the real transformation happens. Converting a point cloud into a usable BIM model is not a single action—it’s a structured workflow that requires both technical precision and practical experience. Each step plays a critical role in ensuring the final Autodesk Revit model is accurate, efficient, and fit for purpose.
Step 1 – Point Cloud Data Preparation
Before anything enters Revit, the point cloud must be properly prepared.
- Clean noise and remove irrelevant data
- Align coordinates to match project reference systems
- Split into manageable zones if the dataset is large
Practical tip: Skipping this step often leads to heavy files, lagging performance, or even Revit crashes. A clean dataset is the foundation of a smooth workflow.
Step 2 – Import Point Cloud into Revit
Once prepared, the data is brought into Revit using formats like RCP or RCS.
- Use Link Point Cloud instead of importing directly
- Maintain flexibility and better performance with large datasets
Key insight: Linking the point cloud allows Revit to handle large files more efficiently, reducing system strain and improving usability.
Step 3 – Model Creation (The Hard Part)
This is the most time-consuming and skill-intensive phase.
- Reconstruct walls, floors, and structural elements
- Model MEP systems based on scan data
- Interpret incomplete or unclear geometry
Important: This step cannot be fully automated. While tools can assist, accurate modeling still depends heavily on human expertise and experience.
Step 4 – Level of Detail (LOD) Definition
Not every project requires the same level of detail, so defining LOD early is critical.
- LOD 200 → conceptual representation
- LOD 300 → coordination and design
- LOD 400 → fabrication and construction
Why it matters: LOD directly impacts modeling time, cost, and project outcomes. Over-modeling wastes resources, while under-modeling limits usability.
Step 5 – Validation & Quality Check
The final model must be verified against the original point cloud.
- Compare geometry with scan data
- Check allowable deviation thresholds
- Perform clash detection for coordination
This step ensures the model is not only visually accurate but also reliable for real-world application—whether for design, construction, or facility management.
👉 In practice, the difference between an average model and a high-quality BIM deliverable lies in how well this workflow is executed end-to-end.
How Professional BIM Teams Do It Differently
Successfully delivering a high-quality model is not just about knowing how to convert point cloud to Revit model—it’s about how the entire workflow is managed from start to finish. This is where professional BIM teams stand apart.
Standardized Workflow
Professional teams follow a structured, repeatable workflow instead of handling each project differently. This ensures consistency, reduces errors, and keeps the process efficient from data preparation to final delivery.
Define LOD from the Start
Rather than deciding detail levels midway, experienced teams define the required Level of Detail (LOD) at the beginning. This helps align expectations, control scope, and avoid unnecessary modeling work.
Clear QA/QC Process
Quality is not checked at the end—it’s controlled throughout the process. A proper QA/QC system ensures the model stays accurate, coordinated, and aligned with the original point cloud data.
Optimized Modeling Time
Efficiency comes from experience and workflow optimization. Professional teams know how to prioritize, streamline repetitive tasks, and avoid rework—saving both time and cost.
At Harmony AT, Scan to BIM projects are executed using structured and proven workflows. This approach helps reduce modeling time, improve accuracy, and ensure that every model aligns with the specific objectives of the project—whether for design, coordination, or long-term asset management.
When Should You Outsource to Convert Point Cloud to Revit Model?
Not every project needs to be handled in-house—especially when the goal is to convert point cloud to Revit model quickly, accurately, and at scale. In many cases, outsourcing is not just a convenience, but a smarter strategic decision.
You should consider outsourcing when:
- The project is large or complex: Massive point cloud datasets and intricate geometries require experienced teams and optimized workflows.
- You lack in-house BIM resources: Building or training a team takes time—outsourcing helps you move forward without delays.
- You’re working with tight deadlines: Professional BIM teams can scale quickly and deliver faster without compromising quality.
- High LOD is required : Detailed models (LOD 300–400) demand precision, consistency, and rigorous QA/QC processes.
Conclusion
To successfully convert point cloud to Revit model, it’s not just about tools—it’s about having the right workflow, clear LOD definition, and strict quality control. When done correctly, this process transforms raw scan data into a reliable BIM model that supports real project outcomes.
For complex projects or tight timelines, working with an experienced partner like Harmony AT can help you achieve faster, more accurate results—while avoiding costly mistakes along the way.
FAQ
What is the best way to convert point cloud to Revit model?
The most effective approach is to follow a structured workflow: clean and prepare the point cloud, import it properly into Autodesk Revit, model key elements based on the data, define the required LOD, and validate the final model against the scan. Accuracy depends more on workflow and expertise than on tools alone.
Can Revit automatically convert point clouds into BIM models?
No, not fully. While Revit and supporting tools can assist with visualization and partial automation, the process still requires manual modeling and interpretation. Human expertise is essential to ensure accuracy and completeness.
How long does it take to convert point cloud to Revit model?
It depends on project size, complexity, and required LOD. Small projects may take a few days, while large or highly detailed models (LOD 300–400) can take weeks. A well-optimized workflow can significantly reduce this time.
What Level of Detail (LOD) should I use?
It depends on your project goals:
- LOD 200 → concept design
- LOD 300 → coordination
- LOD 400 → construction/fabrication
Choosing the right LOD early helps avoid unnecessary work and keeps costs under control.
Is outsourcing point cloud to Revit modeling worth it?
In many cases, yes. Outsourcing helps you convert point cloud to Revit model faster and more accurately, especially for complex or large-scale projects. Experienced teams like Harmony AT can reduce modeling time, improve quality, and minimize costly rework.
What are the biggest challenges in Scan to BIM projects?
Common challenges include handling large datasets, dealing with noise or missing data, aligning coordinates correctly, and maintaining accuracy during modeling. These issues can be managed effectively with proper preparation, workflow, and QA/QC processes.
Categories